Using udev, it's possible to automate setting up of adb
and gpsd for USB connections when plugging in the phone.
Follow this procedure for
setting it up. Note that you will need a systemd based
system for this. Most of the popular distros now use this.
PLEASE BE SURE YOU HAVE BEEN THROUGH THE MANUAL PROCEDURE
AND HAVE IT WORKING BEFORE EXECUTING THIS PROCEDURE. You can
find the Linux USB setup here:
Linux USB setup .
-
Grab the following file from the Downloads page:
linux-auto.tar.gz
Unzip in a convenient location.
-
Have your mobile with USB debugging enabled ready and run
install.sh as root or sudo.
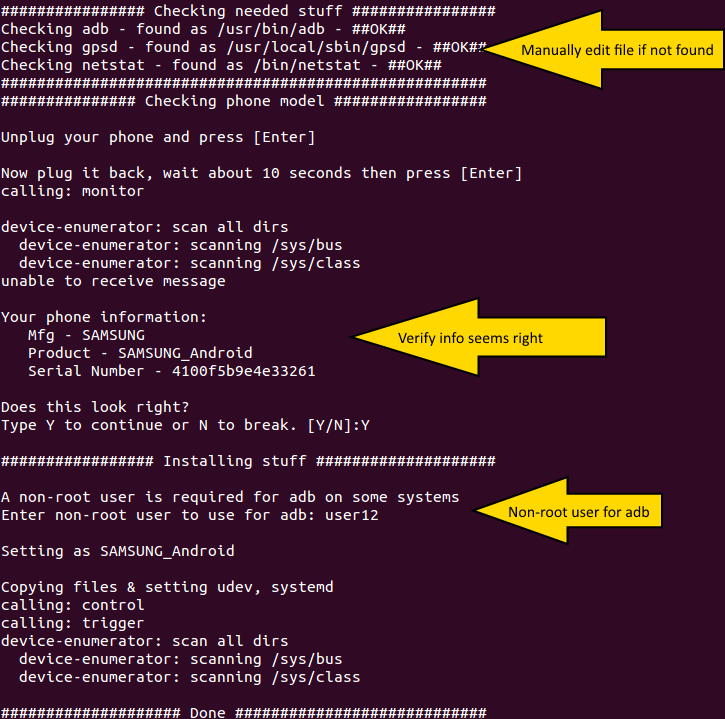
[user@tc01 ~]# sudo ./install.sh
-
Follow the prompts during the script. It will perform
the following tasks:
-
Check for adb, gpsd, and netstat existing on the system.
If it does not find them, you will need to update the file
/usr/local/bin/adb_gps_usb.sh with locations later.
-
Have you plug the mobile in while listening for information.
The script will post what it finds and ask the user if it is
correct. This is needed for the udev rule that is created
and located at /etc/udev/rules.d/.
-
Ask for a user to run adb as. Running adb as root does not
work correctly on some systems. I noticed it will detect
the device, but treat it as offline. Use the username you
usually login as.
-
The following files are created:
-
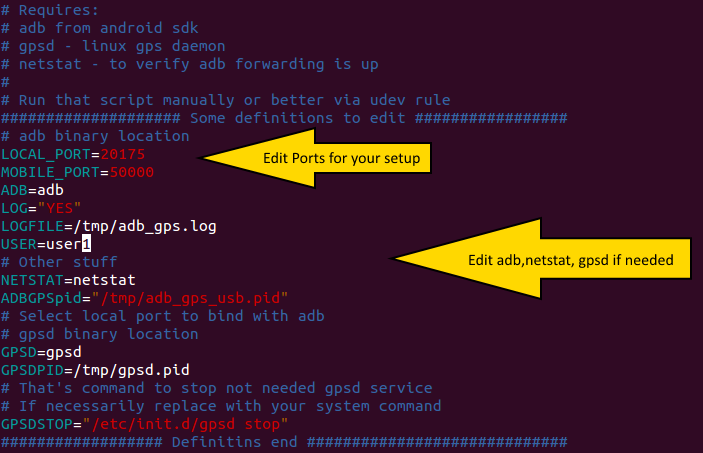
/usr/local/bin/adb_gps_usb.sh
-
/etc/systemd/system/adb-gps.service
-
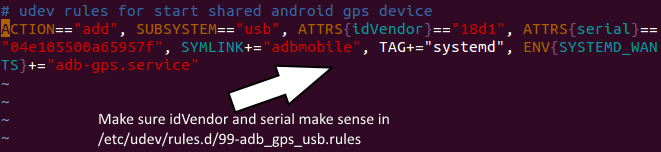
/etc/udev/rules.d/99-adb_gps_usb.rules
-
Then the systemd daemon control is restarted. Udev
rules are reloaded as well.
-
If the script did not find adb, gpsd, or netstat, edit
the file /usr/local/bin/adb_gps_usb.sh
with the full location to the binaries. The specific
ports used for adb need to be edited here as well.
-
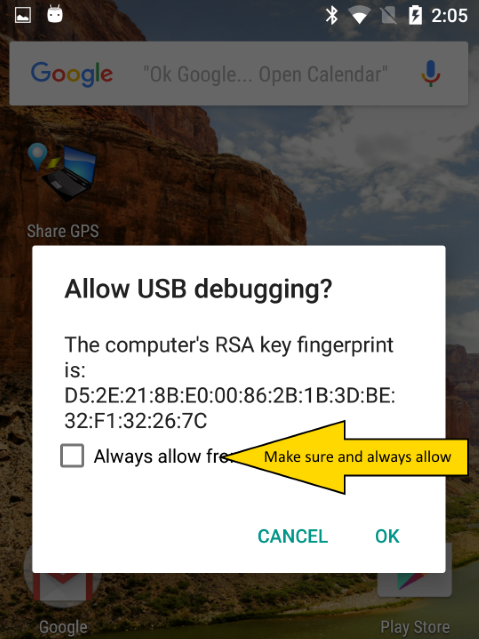
Be sure you have authorized you PC with the phone and
have it set to always authorize. Run adb devices
and check for the following prompt on your device if
it is not set to always authorize
-
Now it should be possible to unplug and plug back in
the phone and have adb and gpsd start automatically.
Start the USB connection on Share GPS.
-
To test things, try using one of the gpsd example clients.
Run xgps &and verify Share GPS indicates
Connected. You should see coordinates in xgps.
Troubleshooting:
-
Try running 'adb_gps_usb.sh start' manually after plugging
in the phone and see if that works.
-
Check the udev rule at '/etc/udev/rules.d/99-adb_gps_usb.rules'.
You can use 'lsusb' to check the vendor ID.
-
Check that the processes are running after plugging in
ps -ef | grep adb
You should see the adb_gps_usb.sh script and adb running.
If they run shortly and then end, it may indicate adb
running as the wrong user. If nothing is happening, check
the udev rule for having the correct Vendor and S/N.
-
If adb is working, check for gpsd:
ps -ef | grep gpsd
-
If things still aren't working, re-check adb_gps_usb.sh
for using the correct ports for your setup.
Additional Notes:
If wanting to support multiple phones, the install script can
be run multiple times, there are two important things to
consider:
-
The /usr/local/bin/adb_gps_usb.sh script will
be overwritten on install. If you have special edits, back
up the file.
-
The udev rule will be overwritten with info from the new
phone. To continue to support the old phone, rename the rule
to another name in the /etc/udev/rules.d directory. Example:
mv 99-adb_gps_usb.rules 99-adb_gps_usb.nexus.rules
